
HERE we are once again, another week begins
and I am embarking on another DIY journey.
To make something beautiful, simple and most importantly...fast!
SO NOW WE HAVE...
Back by POPULAR Demand!!!
EASY PELMET/CORNICE BOXES
The supplies you will need this time are easy..
1. Fabric
I LOVE DWELL STUDIO
and I am particularly fond of this
collection of prints and colors...

I have the Dwell Studio for Target Bedding...
and you might remember that I recovered my Bedroom chair in
another Dwell Studio Print.
2.Foam Core Board
the kind your kids use for school projects

they come 3 in a pack for about 8-$10. You will need 2 per Cornice
so, that means... you will need 2 packs total.
(can you tell I have been helping with Math homework?)
 |
Talk about EASY! |
Okay here we go again...
First, measure your window width and then add 9", and this is why. You will need 3 1/2" on either side to be the SIDES and one extra inch on either side to set the Cornice out from the window frame. (You will need to adjust YOUR personal measurements if you want your Cornice Shallower or narrower or wider.
Now, Take your board, (I just used the exact size of the board 20" x 30" (NO cutting!) and I cut the second board so that the EQUALED the measured length I needed.
After you get the right combined length, tape the two pieces together, back and front.

NEXT....on one side of your board, which will be the FRONT, measure out 3 1/2" on all sides, draw a line, and cut with your mat knife, BUT only a cut half way through, you are going to bend this to make your BOX.


Lay your batting down on the FRONT Face of the Cornice. This is where I discovered that
I did not know where my staple gun was and took a break and ran to the grocery store and got packing tape.
I taped the edge down on the bottom and on the top to hold the batting in place

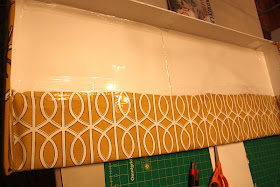
I had also discovered that I did not have enough fabric to cover the WHOLE piece so I pieced together a coordinating DWELL STUDIO Fabric, and created a lining.

 |
| I love how this lining peeks out of the bottom |
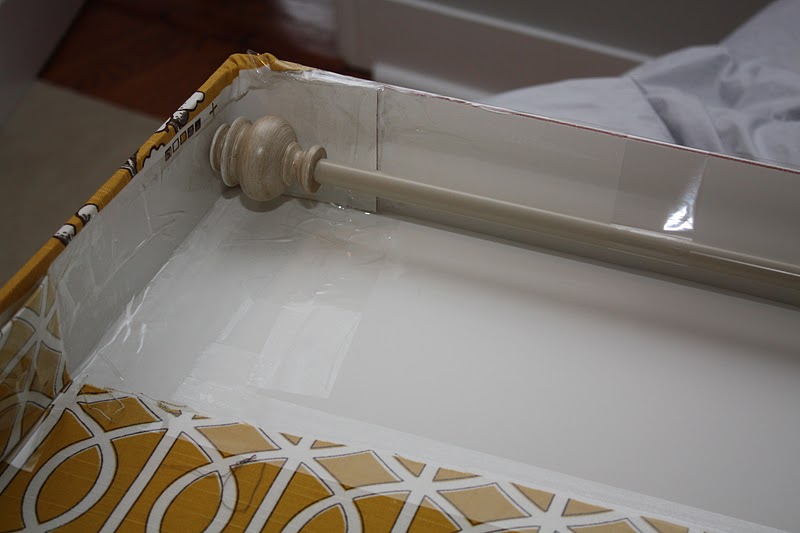
I taped the fabric to the board...


...I put the curtain rod, which held the Bedroom curtains inside the top of the Cornice...
Okay...are you ready for the REVEAL???


lets just go ahead and take a Bedroom tour...First I had to make the bed!
 |
| on my "to do" list is to make a cushion and upholster this bench. |


 |
| Pillows made by me, Amy Butler Home Decor Fabric... |

...another project completed...only about a Million more to go...
I am contemplating upholstering this headboard for one....
and the beat goes on...
I am wondering...
Do you have any fun projects lined up?
What do you have on your windows?
Curtains? or blinds?
Cornices or Valences?
Nothing?
Hi Leslie! Thanks for stopping by my blog this morning and following me! I am honored to follow you right back! I have been looking around your site; and I love it! Many Blessings to you!!
ReplyDeleteI love your blog! We both have big old houses and very similar taste! I'm your newest follower! :)
ReplyDeleteMandy
biblicalhomemaking.com
Very cute!! Thanks for stopping by and good luck with your blog!
ReplyDeleteThanks so much for this detailed tutorial. The results are gorgeous! I will definitely use it.
ReplyDeleteWe are currently searching for an old country-ish home (you can see the two we've looked at thus far on my blog). Yours is beautiful!
Visiting from Tip Junkie. Following you now. :)
Love it! This is going on my Pinboard!
ReplyDeleteI've been looking for a simple way to make a cornice - this looks perfect and I'm going to Target tomorrow for my supplies! I already have my material and have been looking and looking for ideas but all seemed more complicated than necessary. Thanks!
ReplyDeleteAbsolutely LOVE these! Just wanted to let you know I featured these on my blog today, in an article about the many different types and techniques of "no-sew" window treatments.
ReplyDelete-Erin
diyonthecheap.blogspot.com
Thank you! Did these today for my little boy's nursery! (his crib is dangerously close to the windows, so no drapes allowed.) These really spruce up the windows!
ReplyDeleteWhat a great tutorial on pelmet boxes and your windows look gorgeous - your whole room is beautiful too! I've got this linked to my pelmet boxes post too today, well done!
ReplyDeleteOh my goodness I'm drooling over the chair in this room. Can you source it for me? Is it Dwell fabric?
ReplyDeleteI'm loving that our styles are so similar and we both have very old homes.
~Sarah
HI SARAH, yes this is a dwell studio fabric, in brindle, try fabric.com...great deals!!!
ReplyDeleteThis is a great step by step tutorial! Can't wait to give it a try this weekend. Question - what keeps the box from falling down? It looks like its just resting on the curtain rod. Did you do something more to keep it in place?
ReplyDeleteIn this room, yes, I did tape to curtain rod inside and then hung it up. However, I recently took it down and just tapped nails in right along the top edge of the window moulding and set it upon the nails.
ReplyDeleteHow much fabric did this take total? Thanks!
ReplyDelete